Showing posts with label DIY Fashion. Show all posts

Aug 4, 2015

DIY Kimono: 2 ways


Hello!
Today I will show you two ways you can make your own kimono. (Hey Fran, remember last year when I said I would make a tutorial? It's a bit late but here it is!) It's quite easy so if you want to learn how to sew but don't know where to start, look no further. The first way is the easiest and fastest since it's basically just a rectangle.
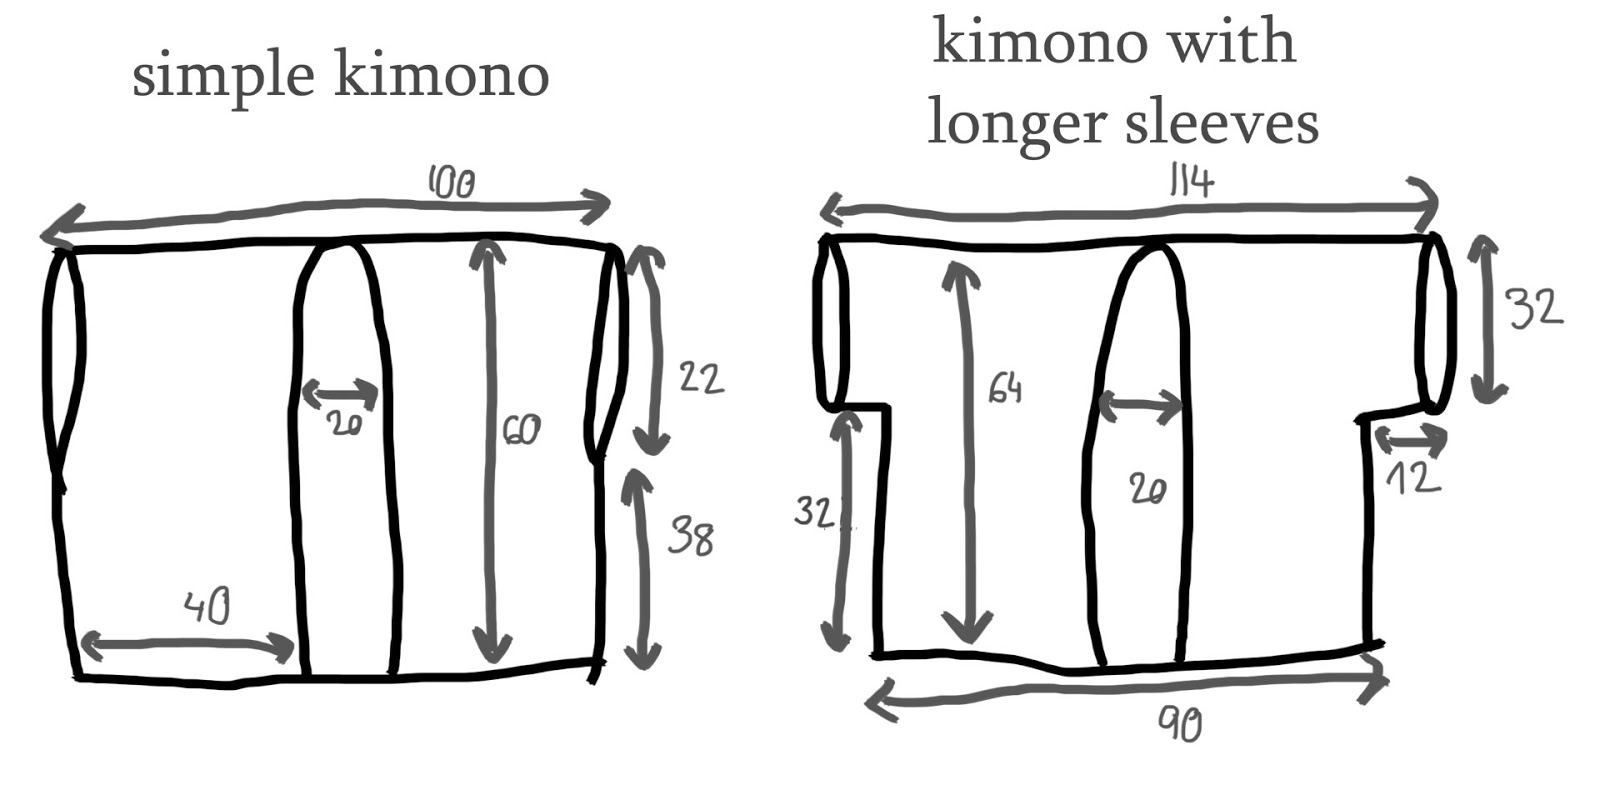
Cut your fabric folded. On the drawing above, the fold would be at the top, horizontally. This method is faster and makes sure that the shape is symmetrical.

Simple kimono:
STEP 1- Fold and sew the borders of the sides to avoid fraying.
STEP 2- Sew sides together, with the right sides of the fabric facing each other. Don't forget the two opening for the arms.
STEP 3- Cut an opening/slit for the front opening of the kimono. Fold and sew the borders to avoid fraying.
STEP 4- Fold and sew the hem.

With longer sleeves:
STEP 1- Sew sides and bottom of sleeves together, with the right sides of the fabric facing each other.
STEP 2- Fold and sew the border of the sleeves.
STEP 3- Cut an opening/slit for the front opening of the kimono. Fold and sew the borders to avoid fraying.
STEP 4- Fold and sew the hem.

I really hope this tutorial is useful and understandable as I can be a bit vague when describing things. Please tell me if you want to make a kimono and don't understand one step.
Love, Elsa

Jul 15, 2015

DIY Backpack


Hello!
Today is a post that I'm really excited about. I made my own backpack! It took me a while to understand how to do it and to actually do it but I am super proud of it and I decided to make a tutorial. This is an advanced sewing projects, I wouldn't advise it for beginners. (I have a kimono tutorial coming up in August that is totally suitable for beginners.)


Above are the measurements for everything you need to cut. All measurements are in cm. The black doodles are for the main fabric. I used faux-leather. And the blue is for the lining. I used a black and blue striped cotton.
STEP 1- Cut all your fabric. Add seam allowance to my measurements. (The measurements for the lid lining are the same as the ones for the lid. The patches can be any shape you want, just make sure the width is at least 6cm.)
STEP 2- Sew the front and back pieces of your main fabric together. (right sides facing each other). You should have a cylinder-like shape.
STEP 3- Attach the cylinder to the bottom of the main fabric. (right sides facing each other). Flip inside out.
STEP 4- Fold the straps and sew. Flip inside out. (It can be a bit hard if your straps are long and thin and the material is thick like faux leather, but it's possible)
STEP 5- Attach the bottom of the straps where you want them to be on the back of the bag.
STEP 6- Hand-sew the small patches over where you just sewed to hide it.
STEP 7- Sew the lining pocket together (right sides facing each other)
STEP 8- Cut a slit the width of the pocket in the middle of one side of the lining. Sew the pocket to that side on each side of the slit. (right sides facing each other) Flip inside out.
STEP 9- Attach both sides of the lining together (right sides facing each other)
STEP 10- Fold the long strip several times and sew to make a thin cord. Make two small vertical slits at the top on the bag's front. The strip will go between the lining and the bag and go through the slits to close the bag once finished.
STEP 11- Attach the lining and the bag together a few centimeters below the top.
STEP 12- Put the strip in between the lining and the bag as close to the line you just sew. Sew at the top of the bag. Cover the lining with the main fabric to make a clean edge.
STEP 13- Attach the lid to the lid lining. Cover the lining with the main fabric to make a clean edge.
STEP 14- Attach the lid and the bag together with the top of the straps in between. (right sides facing each other)
And you are done! Congratulations!!

If you were curious: this is how it closes:


I really hope you find this tutorial helpful. Don't hesitate to ask me questions if there is something that you don't understand. I really hope you try to make your own backpack. Not only will it look exactly like you want it too, but it will also make you super proud every time you wear it.
Love, Elsa